What is Temporal Anti-Aliasing (TAA) - with implementation in DirectX 11
Temporal anti-aliasing (TAA) is a graphics post-processing effect which aims to make an image look more pleasing by reducing jagged edges and shimmering artifacts. In this blog post I will briefly explain why aliasing occurs, some previous anti-aliasing solutions and how TAA tries to solve issues with them. Lastly I will go over my TAA implementation in DirectX 11.
What is aliasing?
Aliasing is a graphics artifact which is produced as a result of undersampling the geometry which we are rendering. Triangles which we want to render must be mapped to pixels on the screen. This process is called rasterisation.

Rasterisation of a triangle. Left: how the triangle aligns with pixels. Right: Pixels shaded as a result of rasterisation
As you can see, the rasterising step tries its best to match the triangle, however because we are going from a continuous signal (triangle edge) to a finite pixel grid of discrete sizes, we are forced to downsample and therefore lose detail. This can be remedied somewhat by increasing the screen resolution, which allows for a closer mapping of geometry to pixel.
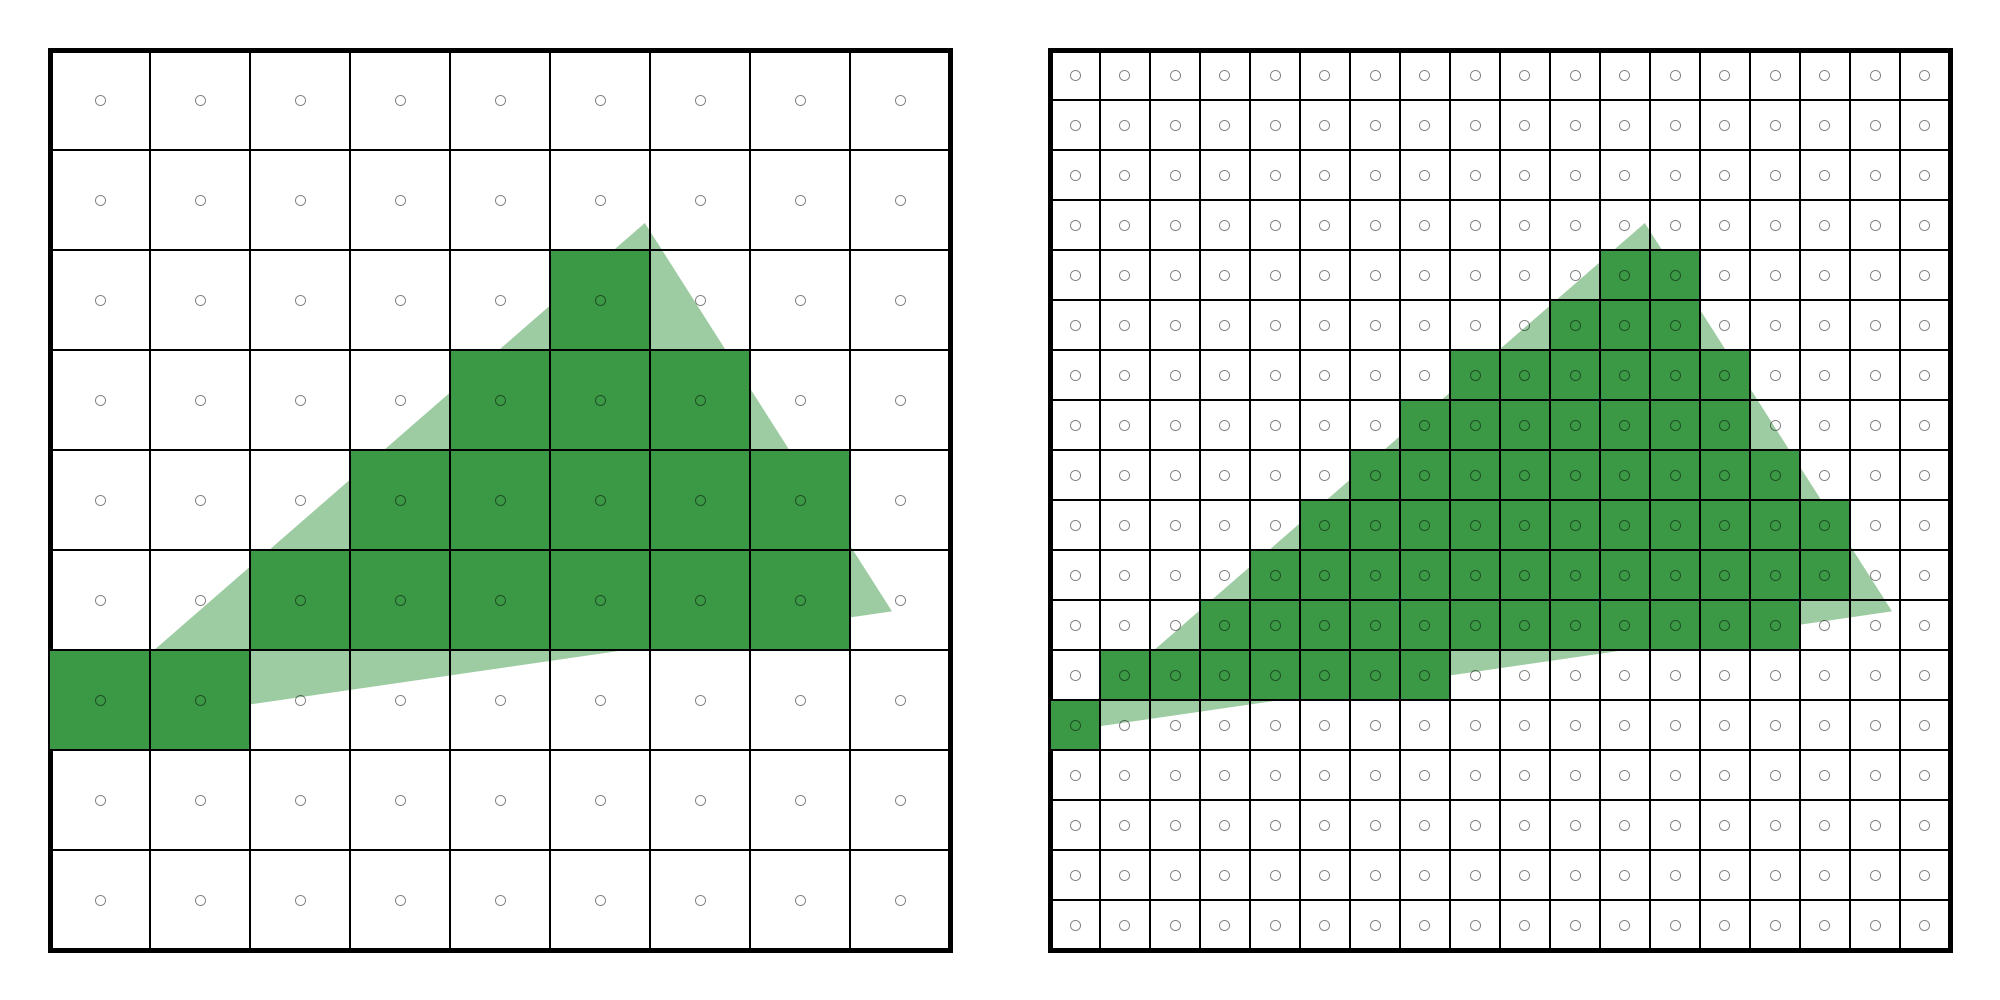
Left: 1x resolution, lots of detail is lost due to large pixel size. Right: 4x resolution, more of the triangle is covered by rasterised pixels.
Anti-aliasing techniques
This nature of increasing the resolution to more closely represent scene geometry is the basis of many anti-aliasing techniques. I’ll be going over SSAA, MSAA and TAA.
SSAA
Super-sampling anti-aliasing (SSAA) is one of the earliest and least complex anti-aliasing techniques. The premise behind it is to use the resolution trick we mentioned above by rendering the scene at an increased resolution, and then downscale it back into your original resolution. For example at 1080p with 4x SSAA, you would generate a 4K image. In order to then view this image on your monitor, you would downscale back to 1080p by blending neighbourhood pixels together, usually with some weighted filter. The result is a slightly softer image which takes into account sub-pixel details to reduce aliasing.
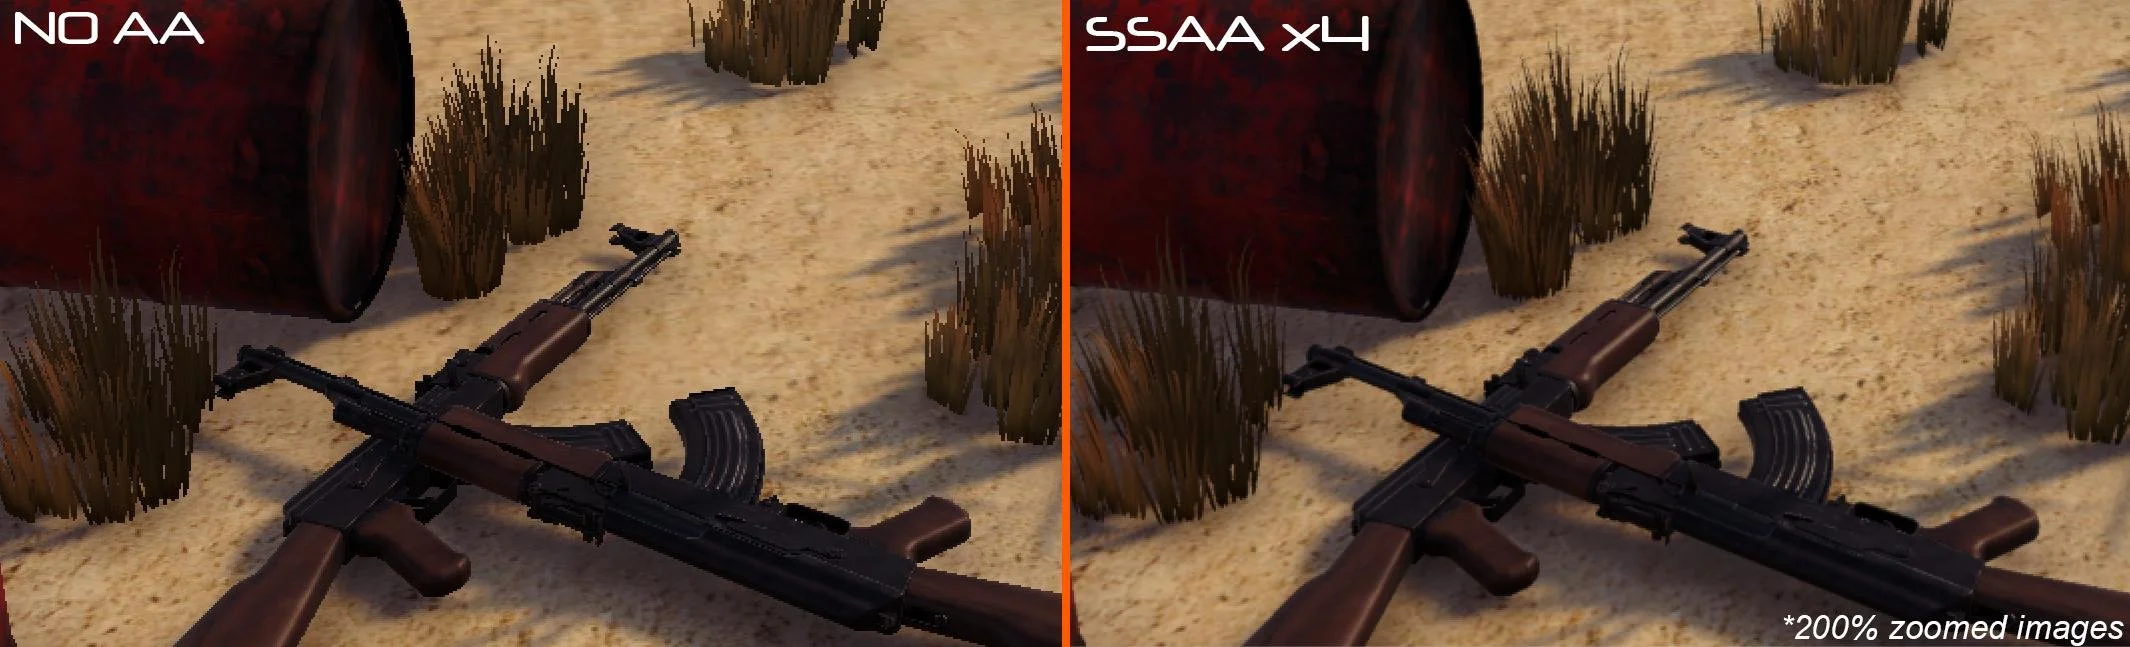
Source: ArviVR
While SSAA produces a high-quality anti-aliased image, rendering all your geometry at 4 times your native resolution comes at a significant cost to your pixel shader. If only there was a way to get the same number of samples as 4x SSAA while incurring the pixel shader cost of 1080p…
MSAA
Multi-sample anti-aliasing is a technique which tries to get SSAA-like quality without its great performance cost. It does this by taking multiple samples during the rasterisation stage and blending them before passing the result to the pixel shader. This allows us to display sub-pixel detail while keeping the cost of the pixel shader as if we had no anti-aliasing at all.
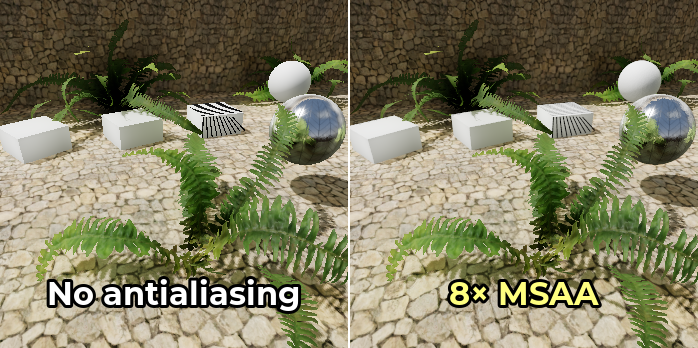
Source: Godot Engine
At last, good looking anti-aliasing at a relatively low cost! However there is one big limitation of MSAA: it doesn’t play nicely with deferred rendering. On top of that, MSAA only works on geometry edges so it won’t help with aliasing from things such as specular reflections.
TAA
TAA tries to take the learnings of the previous techniques to provide anti-aliasing using multiple samples at a low cost, whilst being compatible with forward, forward+ and deferred rendering. The way TAA is able to be so computationally cheap is because it only takes a single sample per pixel from the current frame. So where does it get its multi-sampling benefits from? By utilising previous frames.
The “temporal” in TAA refers to using frame data over time. Once the scene is rendered, it is copied into a history buffer which becomes an input for the next frame. In the next frame, we blend between the current frame’s color and the color at that same location in the history buffer. This gives us multi-sampling, however all the samples are always taken at the centre of the pixel and therefore giving us the same result as having a single sample. In order to get those sub-pixel details back, we offset the camera very slightly (less than a pixel) to get differing samples. The more camera offsets we use, the more sub-pixel detail we can gain, however it will also slow down the convergence rate of the blended image. For this reason, these sampling sequences are usually kept around 8 or 16 samples.
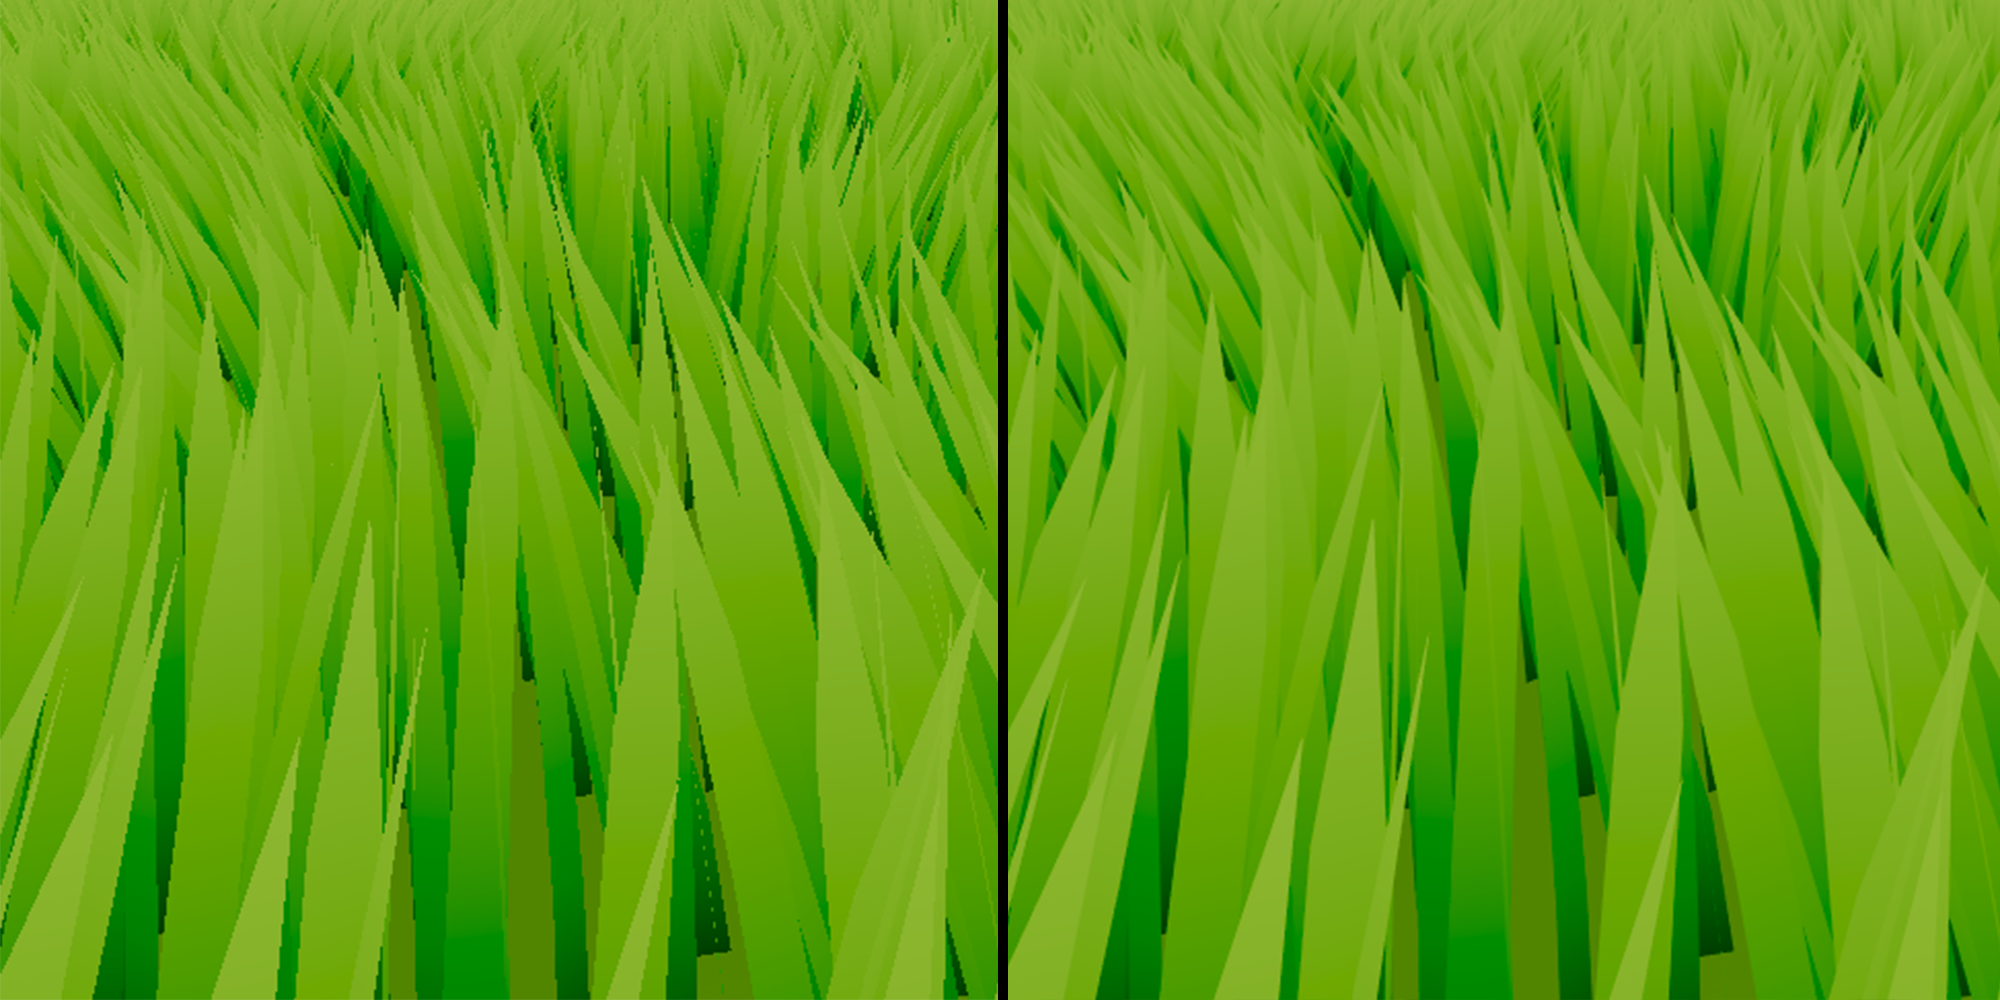
Screenshot of a static scene with no motion. Left: no anti-aliasing. Right: TAA
The result is an anti-aliased image at a low cost, however TAA does have its drawbacks. The image may contain ghosting from samping an out-of-date history buffer, and is also susceptible to becoming blurry, especially in motion (technically, all multi-sampling techniques must blend their samples which is a blur). There are techniques to limit these, however the result is usually still not as sharp and clean as SSAA or MSAA.
DirectX 11 Implementation
I will now explain my implementation of TAA for a simple scene with no transparency.
TAA Pass
The first step is to create a post-process TAA shader which reads from a history buffer. Every frame, we want to take the current frame’s color and blend it with the color in the history buffer at the same UV coordinate. The higher the alpha value, the more influence we give to the history buffer. This is the base that we will work from.
float4 main(PS_In p) : SV_TARGET
{
    float4 CurrentPixel = ScreenTexture.Sample(LinearSampler, p.TexCoord);
    float4 HistoryPixel = HistoryTexture.SampleLevel(PointSampler, p.TexCoord, 0.f);
    return lerp(CurrentPixel, HistoryPixel, Alpha);
}
Once this pass is complete, we store this newly generated texture as the history texture to be used in the next frame.
Jitter
At this point, we shouldn’t see much of a difference because we are still sampling from the same point every frame. To get the multi-sampling effect, we have to jitter our camera. I decided to use the Halton(2, 3) sequence to create a 8 sample sequence and applied the jitter to my camera’s projection matrix. Keep in mind that you’ll want to store both the jittered and non-jittered projection matrices.
void CameraManager::CalcJitteredMatrices(uint32_t FrameIndex, const std::pair<int, int>& Dimensions)
{
	if (!m_PostProcessManager->IsUsingTAA())
	{
		// set jittered matrices as non-jittered;
		m_ActiveCamera->GetProjMatrix(m_CurrJitteredProjMatrix);
		m_ActiveCamera->GetViewProjMatrix(m_CurrJitteredViewProjMatrix);
		return;
	}

	float JitterX = Halton(FrameIndex % m_NumJitterSamples, 2) - 0.5f;
	float JitterY = Halton(FrameIndex % m_NumJitterSamples, 3) - 0.5f;

	JitterX *= (2.f / (float)Dimensions.first);
	JitterY *= (2.f / (float)Dimensions.second);

	DirectX::XMFLOAT4X4 TempMatrix;
	DirectX::XMStoreFloat4x4(&TempMatrix, m_ActiveCamera->GetProjMatrix());

	TempMatrix._31 += JitterX;
	TempMatrix._32 += JitterY;

	m_CurrJitteredProjMatrix = DirectX::XMLoadFloat4x4(&TempMatrix);
	m_CurrJitteredViewProjMatrix = m_ActiveCamera->GetViewMatrix() * m_CurrJitteredProjMatrix;
}
Once we have the jittered camera projection, we want to render our scene geometry using this projection. At this point we should see the anti-aliasing starting to take effect. Even at an alpha of 0.5 there is significantly less noise at the grass further away.
Motion Vectors
Moving the camera or geometry between frames will show ghosting artifacts, since the clip space position of the object has now changed. This means that if we naively sample the history texture at the same UV coordinate as for the current frame, we will find the wrong color which results in ghosting. To solve this, we must account for the clip space offset by using motion vectors (velocity buffer) to perform reprojection.
When rendering our geometry, we also generate a velocity buffer at the same time using multiple render targets. Keep in mind that to calculate motion vectors, we also need to recalculate the clip space position of the previous frame and so we need to remember to store the previous frame’s camera matrices and the object’s transform.
// vertex shader
o.CurrClipPos = mul(float4(o.WorldPos, 1.f), GlobalBuffer.CurrViewProj);
o.PrevClipPos = mul(float4(PrevWorldPos, 1.f), GlobalBuffer.PrevViewProj);

// pixel shader
float2 NDCToUV(float2 NDC)
{
    return float2(NDC.x * 0.5f + 0.5f, (1.f - NDC.y) * 0.5f);
}

float2 CalculateMotionVector(float4 CurrClipPos, float4 PrevClipPos)
{
    float2 CurrNDC = CurrClipPos.xy / CurrClipPos.w;
    float2 PrevNDC = PrevClipPos.xy / PrevClipPos.w;
    float2 CurrUV = NDCToUV(CurrNDC);
    float2 PrevUV = NDCToUV(PrevNDC);
    return CurrUV - PrevUV;
}
Be sure to use the non-jittered matrices for the motion vector calculation, as jittered matrices will give you non-zero motion vectors even when the scene and camera are completely still, resulting in incorrect reprojection. Once the motion vectors are calculated, it’s time to use them in the TAA pass.
float4 main(PS_In p) : SV_TARGET
{
    float2 MotionUV = VelocityTexture.Sample(PointSampler, p.TexCoord);
    float2 ReprojectedUV = p.TexCoord - MotionUV;

    if (IsInRange(ReprojectedUV, 0.f, 1.f))
    {
        float4 CurrentPixel = ScreenTexture.Sample(LinearSampler, p.TexCoord);
        float4 HistoryPixel = HistoryTexture.SampleLevel(PointSampler, ReprojectedUV, 0.f);
        return lerp(CurrentPixel, HistoryPixel, Alpha);
    }

    return ScreenTexture.Sample(LinearSampler, p.TexCoord);
}
After reprojection, it’s possible that the reprojected UV will land outside of the 0-1 UV space. In that case we don’t read anything from the history buffer and just overwrite it with the current pixel data only.
Color Clamping
At this point, we are finding the correct UV coordinate to sample from the history buffer when an object has moved. However what about drawing an object which has just become visible? Since that object was not visible in the last frame, it’s unlikely that it contributed to our history buffer. This can be caused by disocclusion, where an object moves and reveals another object which was behind it. Not accounting for this creates a lot of ghosting.
One solution to this problem is to sample 3x3 neighbourhood pixels around the current frame’s pixel and then clamp the RGB value of the history buffer’s pixel to the min and max values found in the 3x3 kernel. This helps with ghosting however areas with high contrast might still contain artifacts.
float4 main(PS_In p) : SV_TARGET
{
    float2 MotionUV = VelocityTexture.Sample(PointSampler, p.TexCoord);
    float2 ReprojectedUV = bUseMotionVectors != 0 ? p.TexCoord - MotionUV : p.TexCoord;

    if (IsInRange(ReprojectedUV, 0.f, 1.f))
    {
        float4 CurrentPixel = ScreenTexture.Sample(LinearSampler, p.TexCoord);
        float4 HistoryPixel = HistoryTexture.SampleLevel(PointSampler, ReprojectedUV, 0.f);

        if (bUseColorClamping)
        {
            const float MaxFloat = asfloat(0x7f7fffff);
            float3 MinColor = float3(MaxFloat, MaxFloat, MaxFloat);
            float3 MaxColor = float3(-MaxFloat, -MaxFloat, -MaxFloat);
            float2 TexelSize = float2(1.f, 1.f) / GlobalBuffer.ScreenRes;

            for (int dx = -1; dx <= 1; ++dx)
            {
                for (int dy = -1; dy <= 1; ++dy)
                {
                    float2 SampleUV = ReprojectedUV + float2(dx, dy) * TexelSize;
                    float3 Neighbour = ScreenTexture.SampleLevel(PointSampler, SampleUV, 0.f);

                    MinColor = min(MinColor, Neighbour);
                    MaxColor = max(MaxColor, Neighbour);
                }
            }

            HistoryPixel.rgb = clamp(HistoryPixel.rgb, MinColor, MaxColor);
        }

        return lerp(CurrentPixel, HistoryPixel, Alpha);
    }

    return ScreenTexture.Sample(LinearSampler, p.TexCoord);
}
That’s it for my implementation of TAA. Keep in mind that due to its temporal nature, TAA will look better at higher FPS due to less distance between samples. GitHub repo for this project can be found here. Thank you for reading!